Toshiba H9 Manuel d'utilisateur Page 43
- Page / 289
- Table des matières
- MARQUE LIVRES
- H9 ADJUSTABLE SPEED DRIVE 1
- Introduction 4
- Important Notice 4
- About This Manual 5
- Manual’s Purpose and Scope 5
- H9 Adjustable Speed Drive 6
- Table of Contents 7
- General Safety Information 9
- Special Symbols 10
- Equipment Warning Labels 10
- Qualified Personnel 10
- Equipment Inspection 11
- Handling and Storage 11
- Disposal 11
- Installation Precautions 12
- Grounding Capacitor Switch 13
- Power Connections 14
- Protection 14
- Personnel Protection 15
- System Setup Requirements 16
- Operational and Maintenance 17
- Precautions 17
- Motor Characteristics 18
- Power Factor Correction 19
- Light Load Conditions 19
- Motor/Load Combinations 19
- Load-produced Negative Torque 20
- Motor Braking 20
- H9 ASD Characteristics 21
- Installation and Connections 22
- Mounting the H9 ASD 23
- Connecting the H9 ASD 24
- Power Connection Requirements 25
- System Grounding 26
- Lead Length Specifications 28
- I/O and Control 29
- Terminal Descriptions 30
- I/O Circuit Configurations 33
- Typical Connection Diagram 34
- Startup and Test 35
- Electronic Operator Interface 36
- EOI Features 37
- LED Display 38
- LCD Display 39
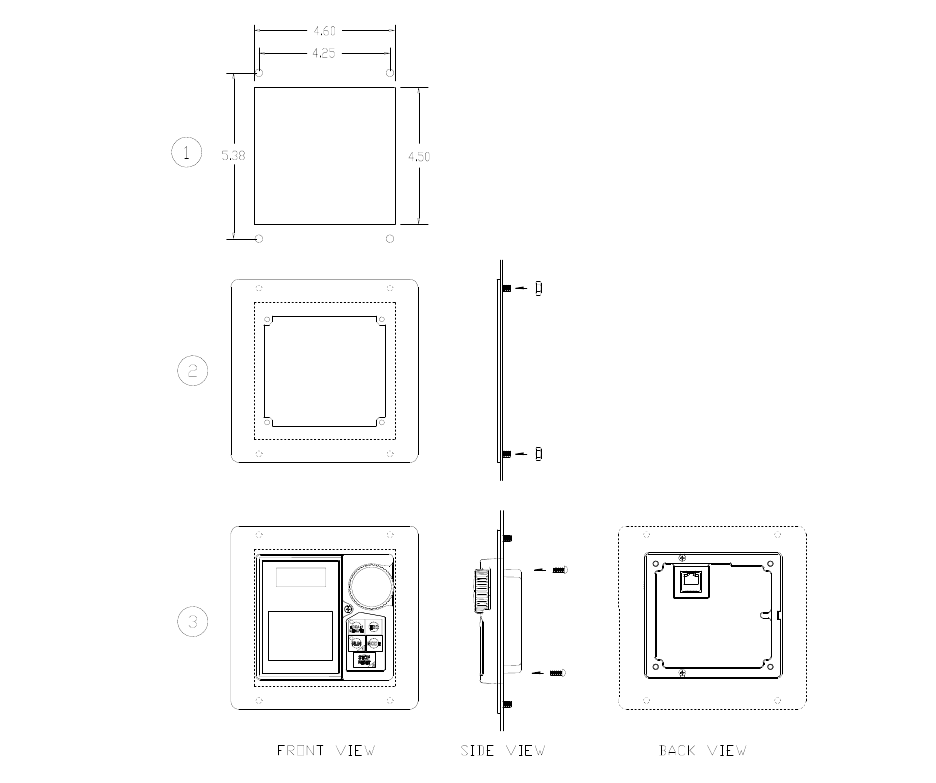
- Keypad Remote Mounting 41
- Keypad Dimensions (mounting) 42
- Command Control (F003) 44
- Frequency Control (F004) 45
- Override Operation 46
- Command Control Selections 47
- Frequency Control 47
- Selections 47
- Root Menus 49
- EOI Command Mode 50
- Monitor Mode 51
- Main Monitor Selections 53
- Program Mode Menu Navigation 54
- System Operation 78
- Volts per Hertz Setting 80
- Motor Current Rating 80
- Motor RPM 80
- Command Source 80
- Frequency Reference Source 80
- Operation (Local) 81
- Default Setting Changes 82
- Save User Settings 83
- F000 F001 84
- F003 F004 85
- F005 F006 86
- F007 F008 87
- F009 F011 88
- F012 F015 89
- F016 F017 90
- F018 F019 91
- F020 F024 92
- F040 F040 93
- F100 F105 94
- F106 F107 95
- F109 F113 96
- F114 F118 97
- F119 F121 98
- F122 F124 99
- F125 F131 100
- F132 F134 101
- F135 F137 102
- F138 F142 103
- F143 F165 104
- F166 F169 105
- F170 F173 106
- F174 F177 107
- F178 F181 108
- F190 F190 109
- F191 F192 110
- F193 F197 111
- F198 F200 112
- F201 F201 113
- F202 F204 114
- F205 F205 115
- F206 F208 116
- F209 F209 117
- F210 F211 118
- F212 F213 119
- F214 F215 120
- F216 F217 121
- F218 F219 122
- F220 F221 123
- F222 F222 124
- F223 F225 125
- F226 F226 126
- F227 F227 127
- F228 F228 128
- F229 F231 129
- F234 F235 130
- F236 F241 131
- F242 F251 132
- F252 F256 133
- F260 F260 134
- F261 F262 135
- F264 F264 136
- F265 F269 137
- F270 F270 138
- F271 F287 139
- F288 F293 140
- F294 F301 141
- F302 F302 142
- F303 F303 143
- F304 F305 144
- F307 F310 145
- F311 F317 146
- F318 F322 147
- F323 F329 148
- F330 F334 149
- F335 F341 150
- F342 F346 151
- F347 F349 152
- F350 F353 153
- F354 F354 154
- F355 F359 155
- F360 F364 156
- F365 F370 157
- F371 F376 158
- F377 F401 159
- F402 F409 160
- F410 F415 161
- F416 F423 162
- F424 F426 163
- F427 F431 164
- F432 F441 165
- F442 F446 166
- F447 F452 167
- F453 F463 168
- F464 F471 169
- F472 F475 170
- F476 F479 171
- F498 F501 172
- F502 F502 173
- F503 F503 174
- F504 F505 175
- F506 F510 176
- F511 F514 177
- F515 F521 178
- F522 F522 179
- F523 F523 180
- Pattern Group 1 180
- Selection 180
- Preset Speed Number 180
- F524 F527 181
- F528 F531 182
- F532 F535 183
- F536 F539 184
- F540 F545 185
- F546 F551 186
- F552 F560 187
- F561 F563 188
- F564 F573 189
- F574 F602 190
- F603 F605 191
- F606 F610 192
- F611 F615 193
- F616 F621 194
- F622 F627 195
- F628 F630 196
- F631 F631 197
- F633 F637 199
- F638 F641 200
- F660 F661 201
- F669 F671 202
- F672 F674 203
- F675 F682 204
- F683 F689 205
- F690 F700 206
- F701 F705 207
- F706 F706 208
- F721 F729 209
- F730 F737 210
- F740 F742 211
- F743 F801 212
- F802 F804 213
- F805 F807 214
- F810 F812 215
- F813 F825 216
- F826 F830 217
- F831 F836 218
- F841 F844 219
- F845 F853 220
- F854 F871 221
- F875 F877 222
- F878 F901 223
- F902 F905 224
- F906 F910 225
- F911 F915 226
- F916 F919 227
- F920 F925 228
- F926 F930 229
- F931 F935 230
- F936 F940 231
- F941 F945 232
- F946 F950 233
- F951 F954 234
- F955 F958 235
- F959 F962 236
- F964 F966 237
- F967 F969 238
- F970 F971 239
- F973 F976 240
- F977 F977 241
- F980 F984 243
- Resolution 250
- Input Setting/Communication 251
- Function 251
- Alarms and Trips 254
- User Notification Codes 255
- Description Possible Causes 256
- Trips/Faults 258
- Viewing Trip Information 263
- Clearing a Trip 263
- Information 264
- Specifications 276
- H9 ASD Optional Devices 278
- INDUSTRIAL DIVISION 289
- Printed in the U.S.A 289
Produits connexes et manuels pour Matériel Toshiba H9
 (71 pages)
(66 pages)
(153 pages)
(71 pages)
(66 pages)
(153 pages)
© 2020, manymanuals.fr. Tous droits réservés | 0.650 s |
 Manymanuals.com
 Manymanuals.de
 Manymanuals.fr
 Manymanuals.it
 Manymanuals.pl
 Manymanuals.cz
 Manymanuals.es
 Manymanuals-pt.com
Commentaires sur ces manuels